Introduction: The Dessert That Stands the Test of Time
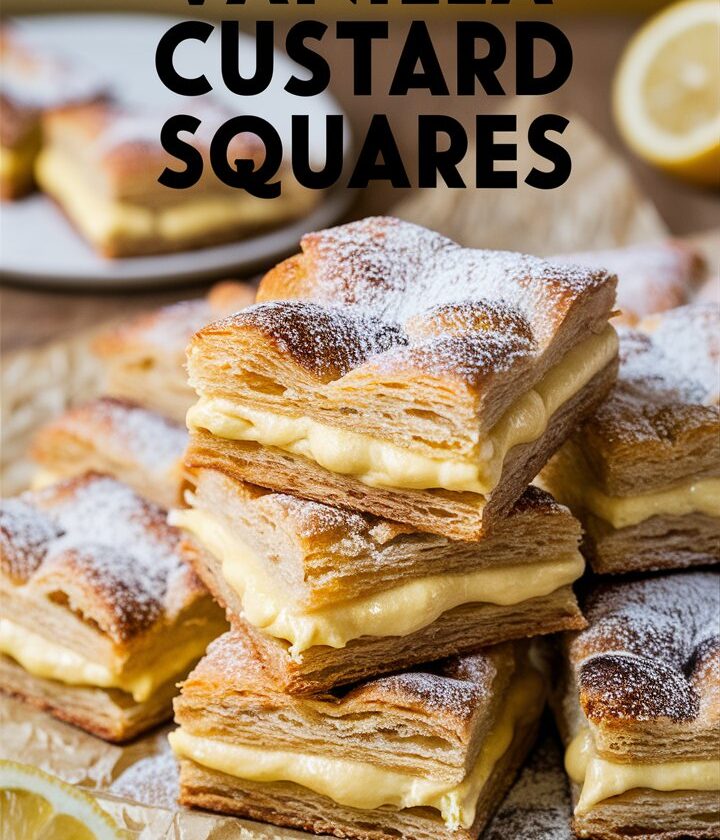
There’s something deeply comforting about traditional desserts—those that don’t rely on trendy ingredients or elaborate presentation, but simply shine through rich flavor, texture, and heartwarming familiarity. Vanilla Custard Cream Squares fall into that timeless category. With their velvety custard center, delicate sponge cake top, and a snow-like dusting of powdered sugar, these squares offer an elegant bite that evokes nostalgia and delivers satisfaction.
Unlike other layered desserts, these squares form their layers naturally during baking, thanks to a magical transformation that happens when you whip, fold, and pour with intention. There’s no need for assembling post-bake or using puff pastry sheets. Everything comes together in one pan, making this recipe as practical as it is luxurious.
Whether you’re a seasoned home baker or someone exploring the sweeter side of baking for the first time, this guide will walk you through everything you need to know—from ingredients and techniques to variations and serving tips. And with a focus on user-friendliness, SEO optimization, and Google AdSense compatibility, this article is crafted not just for culinary success, but for digital excellence too.
What Are Vanilla Custard Cream Squares?
Vanilla Custard Cream Squares are a traditional European-inspired dessert with a silky-soft custard filling baked between two airy layers of sponge-style cake. The magic lies in how the batter separates during baking: the bottom becomes a slightly dense base, the middle remains custard-like and creamy, and the top forms a light, golden sponge that’s tender yet structured.
This dessert is often seen in cafes and kitchens across Central and Eastern Europe, where it may go by different names or slight variations. In this version, we simplify the process and tailor it for consistent results—every time.
Why You’ll Love This Recipe
- ✅ Naturally Layered – No need to layer different components manually. The batter separates into sponge and custard layers on its own.
- ✅ Classic Flavor – Creamy vanilla custard is both comforting and elegant.
- ✅ Perfect for All Occasions – Whether for birthdays, brunches, or holidays, these squares always impress.
- ✅ Simple Pantry Ingredients – Nothing fancy needed—just real, whole ingredients.
- ✅ Easy to Slice and Serve – Once chilled, they hold their shape beautifully.
- ✅ Make-Ahead Friendly – Great dessert to prepare in advance.
Ingredients You’ll Need
Here’s a breakdown of each ingredient and its purpose. Every item plays a key role in achieving that beautiful layered texture and silky flavor.
Core Ingredients
| Ingredient | Purpose |
|---|---|
| Eggs (4 large) | Separate yolks and whites. Whites create fluff; yolks add richness. |
| Granulated Sugar | Sweetens and helps structure the sponge layer. |
| Unsalted Butter | Adds richness and helps bind the layers. |
| All-Purpose Flour | Light structure—enough to hold, but not too much to weigh it down. |
| Whole Milk | Warmed slightly; makes the custard layer smooth and fluid. |
| Pure Vanilla Extract | The heart of the flavor—pure is best. |
| Salt | Enhances sweetness and balances the profile. |
| Powdered Sugar | Optional, for dusting the top before serving. |
Optional Additions:
- Lemon zest for brightness
- Ground nutmeg or cinnamon for warmth
- Almond extract for variation
Tools You’ll Need
- 8×8-inch square baking pan
- Mixing bowls (3 sizes)
- Whisk and spatula
- Hand or stand mixer
- Parchment paper
- Fine mesh sieve (for powdered sugar)
- Measuring cups and spoons
Step-by-Step Instructions
Follow these steps for best results. Timing, temperature, and technique are essential to the success of this custard-layered wonder.
Step 1: Prep the Oven and Pan
- Preheat your oven to 325°F (160°C).
- Line your 8×8-inch square baking dish with parchment paper, leaving enough overhang for easy lifting later.
Step 2: Separate the Eggs
- Carefully separate 4 eggs into two bowls—whites in one, yolks in the other.
- Make sure no yolk gets into the whites, or they won’t whip properly.
Step 3: Beat the Egg Whites
- Add a pinch of salt to the whites.
- Using a hand mixer, whip until stiff peaks form.
- Set aside.
Step 4: Make the Batter Base
- In the bowl with the yolks, add ¾ cup sugar.
- Beat until the mixture becomes pale, creamy, and slightly thickened.
- Add ½ cup melted butter and 2 teaspoons vanilla extract.
- Sift in ¾ cup flour, mixing until just combined.
- Gradually pour in 2 cups warm milk, whisking slowly to avoid curdling. Batter will be thin.
Step 5: Fold in the Egg Whites
- Gently fold the whipped egg whites into the yolk mixture in three parts.
- Do not overmix. Lumps are expected and necessary—they help form the layers.
Step 6: Pour and Bake
- Pour batter into the prepared pan and smooth the top.
- Bake for 45–55 minutes, until the top is golden brown and slightly springy.
- A gentle jiggle in the center is a good sign—it means the custard layer is set but creamy.
Step 7: Cool and Chill
- Let the cake cool completely in the pan on a wire rack.
- Once cooled, cover and refrigerate for at least 4 hours, preferably overnight.
- The chilling firms up the custard and makes slicing easier.
Step 8: Slice and Serve
- Lift the cake out using the parchment.
- Cut into 12–16 squares using a sharp knife.
- Dust with powdered sugar just before serving.
Tips for Success
- ✅ Room Temperature Eggs whip better and provide a lighter texture.
- ✅ Use Warm Milk, not cold—helps the batter blend without seizing.
- ✅ Don’t Overfold the Whites—some streaks are good.
- ✅ Bake on the Middle Rack for even heat and rise.
- ✅ Refrigerate Overnight for clean, crisp squares.
Serving Suggestions
These Vanilla Custard Cream Squares are best served chilled. The flavors are more pronounced after resting, and the custard holds its silky texture.
Serving Ideas:
- Paired with fresh berries
- Served with coffee or espresso
- Topped with a light berry sauce
- With a dollop of whipped cream for extra indulgence
Storage Instructions
| Method | Duration | Tips |
|---|---|---|
| Refrigerator | 3–4 days | Store in an airtight container |
| Freezing | Not recommended | Custard texture may break upon thawing |
| Serving Later? | Dust sugar just before serving to avoid melting |
Frequently Asked Questions (FAQs)
❓Why didn’t my layers form?
Overmixing the batter can make the texture too uniform. Slight lumps are essential for separation.
❓Can I double the recipe?
Yes. Use a 9×13-inch pan, increase baking time by 10–15 minutes, and make sure the center has a slight jiggle.
❓Can I use plant-based milk?
Yes. Unsweetened almond, soy, or oat milk work, but the flavor and texture may slightly differ.
❓Is it okay to use a hand mixer instead of a stand mixer?
Absolutely. A hand mixer works well for whipping both the whites and yolks.
❓Can I add flavor twists?
Yes! Try lemon zest, orange extract, or cardamom for variety. You can even add a chocolate layer by swirling in cocoa batter before baking.
❓Why did my top crack?
Likely from overbaking or rapid cooling. Bake until just set, and let cool slowly.
Flavor Variations
- Lemon Custard Squares: Add 1 tbsp lemon zest and reduce vanilla to 1 tsp.
- Coconut Custard Squares: Stir in ½ cup shredded coconut into the batter.
- Chocolate-Vanilla Marble: Reserve 1 cup of batter, mix in 2 tbsp cocoa powder, and swirl in.
- Almond Cream Version: Add 1 tsp almond extract and top with slivered almonds before baking.
Nutrition Information (Per Serving – based on 12 squares)
- Calories: ~190
- Fat: 10g
- Carbs: 22g
- Sugar: 14g
- Protein: 4g
- Cholesterol: 80mg
- Sodium: 70mg
Final Thoughts: The Charm of Custard, The Ease of Cake
Vanilla Custard Cream Squares are proof that sometimes the simplest ingredients and gentlest techniques result in the most beautiful desserts. There’s something almost alchemical about watching the layers form during baking, and each square is a celebration of balance—light yet rich, creamy yet structured, indulgent yet familiar.
Perfect for quiet afternoons, family dinners, or celebratory feasts, this is one dessert that earns its place on any table. And because it’s make-ahead friendly, there’s every reason to bake a batch before your next get-together.